

How To Change Music In Minecraft Resource Packs
This browser is no longer supported.
Upgrade to Microsoft Edge to take advantage of the latest features, security updates, and technical support.
Introduction to Resource Packs
Earlier building your first Addition for Minecraft: Bedrock Edition, you volition need to create a pack to hold your custom content. There are two types of packs that a creator can make: resources packs and beliefs packs. A resource pack is a binder structure that will incorporate all of your custom models, sounds, textures and other custom content.
In this tutorial, yous will larn the following:
- How a resources pack is created.
- How a manifest file is created.
- How custom textures are loaded into Minecraft.
- The concept of Pack Stacking when working with Improver content.
Requirements
It'south recommended that the following exist completed earlier beginning this tutorial:
- Getting Started with Improver Development
Building the Resource Pack
For Minecraft to notice and utilize your resources files, you have to set up the folders and files in a detail structure. This tutorial will guide y'all through creating this folder and file structure.
Create a folder
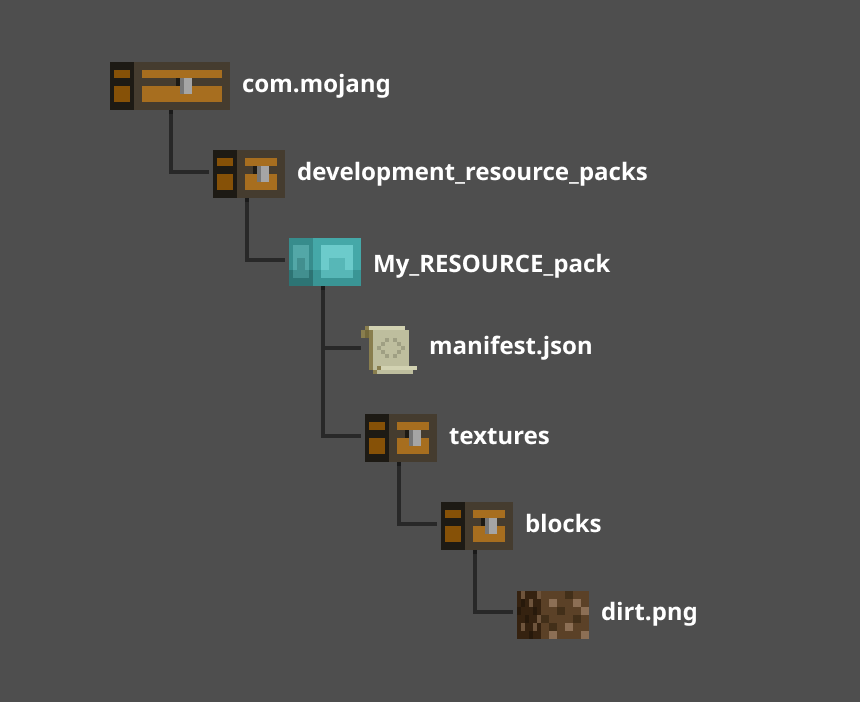
In this section, yous will start past creating a folder called My_RESOURCE_Pack. Well, actually you don't have to call it that. In fact, you tin can proper noun this folder anything y'all want, but the other folders take to be named exactly like this tutorial says then that Minecraft knows where to expect.
- Open your com.mojang binder.
- Double-click the development_resource_packs folder to open it.
- Add together a new folder and name it My_RESOURCE_Pack.
- Double-click the *My_RESOURCE_Pack folder to open information technology.

Create a Manifest File
To load a resources pack into Minecraft, a manifest file will demand to be created. The manifest file is a JSON file that contains the post-obit information:
- Clarification: In-game description of what the resource pack does.
- Name: In-game proper noun of the resource pack.
- UUID: Universally Unique Identifier.
- Version: Version of the resource pack.
- Minimum Engine Version: Required version of Minecraft that this pack volition work in.
Minecraft will parse the information from the manifest file and display it in the Add-on section of the game. Inside the file, the data will be carve up into 2 separate sections: header and modules. The header section will contain the overall information for the pack, and the modules section will comprise the dedicated packages data.
- Correct-click in the Explorer window, select New > Text Certificate.
- Name it manifest.json.
- Y'all will demand to change the file extension from .txt to .json. If your Explorer window does not prove file extensions, you tin enable File Name Extensions under the View tab.

- Y'all will demand to change the file extension from .txt to .json. If your Explorer window does not prove file extensions, you tin enable File Name Extensions under the View tab.
- Double-click the manifest.json file to open it in a text editor.
- Re-create and paste the post-obit code into your file.
{ "format_version": 2, "header": { "description": "My dirt resource pack Add-On!", "name": "My Resource Pack", "uuid":"", "version": [i, 0, 0], "min_engine_version": [1, 16, 0] }, "modules": [ { "clarification": "My First Improver!", "type": "resources", "uuid": "", "version": [one, 0, 0] } ] } UUID
Universally Unique Identifier, or UUID for short, is a unique number used to identify unlike software. For Minecraft, the UUID is used to define a specific pack and to preclude any duplicate software from causing issues. For the header and modules, there will need to exist ii dissimilar UUID numbers entered in each of the "uuid" fields betwixt the quotes. You lot tin become UUIDs from an online UUID Generator such every bit https://www.uuidgenerator.net/.
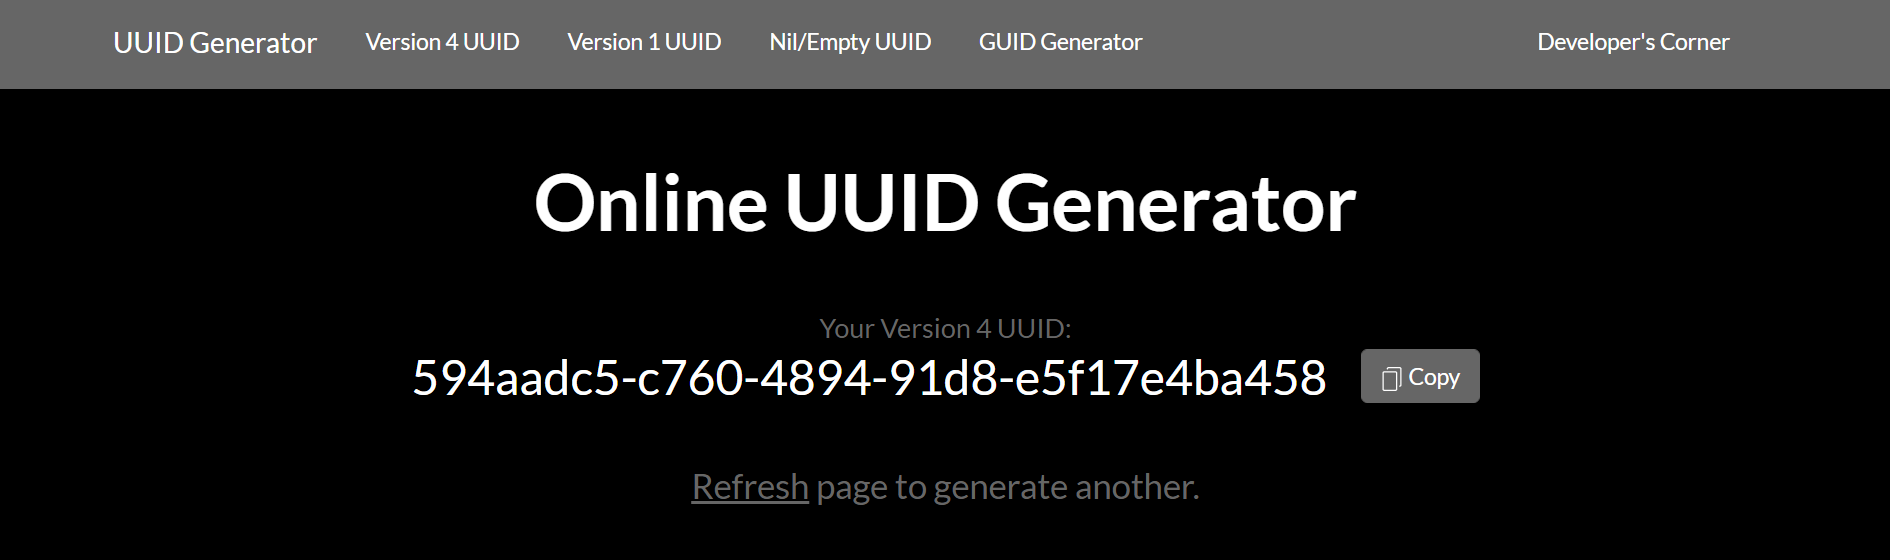
- Copy and paste a UUID into the header section. The UUID will need to be pasted in the
"uuid":""field betwixt the quotation ("") marks in club to be read correctly. - Refresh the webpage to generate a new UUID for use in the Modules department.
- Copy and paste the new UUID into the modules section in the
"uuid"field between the quotation marks. - Save the manifest.json file.
Note
To acquire more about how a manifest.json file works, you tin can click this link to see the folio in the Addons documentation: manifest.json.
Changing the dirt cake
With the manifest file completed, you can now showtime adding custom content to Minecraft. Let'south go started by applying a new texture to the vanilla dirt block. The starting time part of the process involves creating a folder structure to hold the texture.
- In File Explorer, in the My_RESOURCE_Pack folder, create a folder and proper name it textures.
- Double-click the textures folder to open information technology.
- Inside the textures folder, create a binder and name information technology blocks.
- Double-click the blocks binder to open it.
Creating the texture
Now that the folder construction is created, you tin identify your custom textures at that place. This picayune, green square is an example of the blazon of file created by the following steps.

You lot can download it and save it in your blocks folder or follow these steps to create your own texture:
- Open up an image editor such as MS Paint.
- Go to the File card and select Properties.
- Set the Width and Height to 16 pixels each.
- Click OK.
You can now design a design or whatever artwork in the editor. To brand the greenish square, a simple fill color was added.
Note
MS Pigment is used in this example for quick and piece of cake access, but you will need to use a unlike graphics editor for more advanced graphic features like transparency effects or .tga file support.
- When you lot're done editing your texture, go to the File carte du jour and select Save As.
- Cull the PNG picture selection.
- In the Salve Every bit dialog box, navigate to the blocks folder you created.
- Salve the file as clay.png.
Testing the pack
Now that the pack has both a manifest file and a texture file, you can launch Minecraft and test your new resources Add-on.
Of import
Pack Stacking is how content is loaded on pinnacle of vanilla content, causing each object that has the same name in both packs to be overwritten past the latest applied pack. In our example, the original dirt texture is overwritten by our custom texture.
If another pack that uses the dirt.png file is loaded later My_RESOURCE_Pack, and so Minecraft volition utilise that one instead and y'all won't see that change.
Your custom texture will be used on every dirt.png block in the globe, but it volition non be used on blocks of clay with grass on them because those cake have a different proper noun.
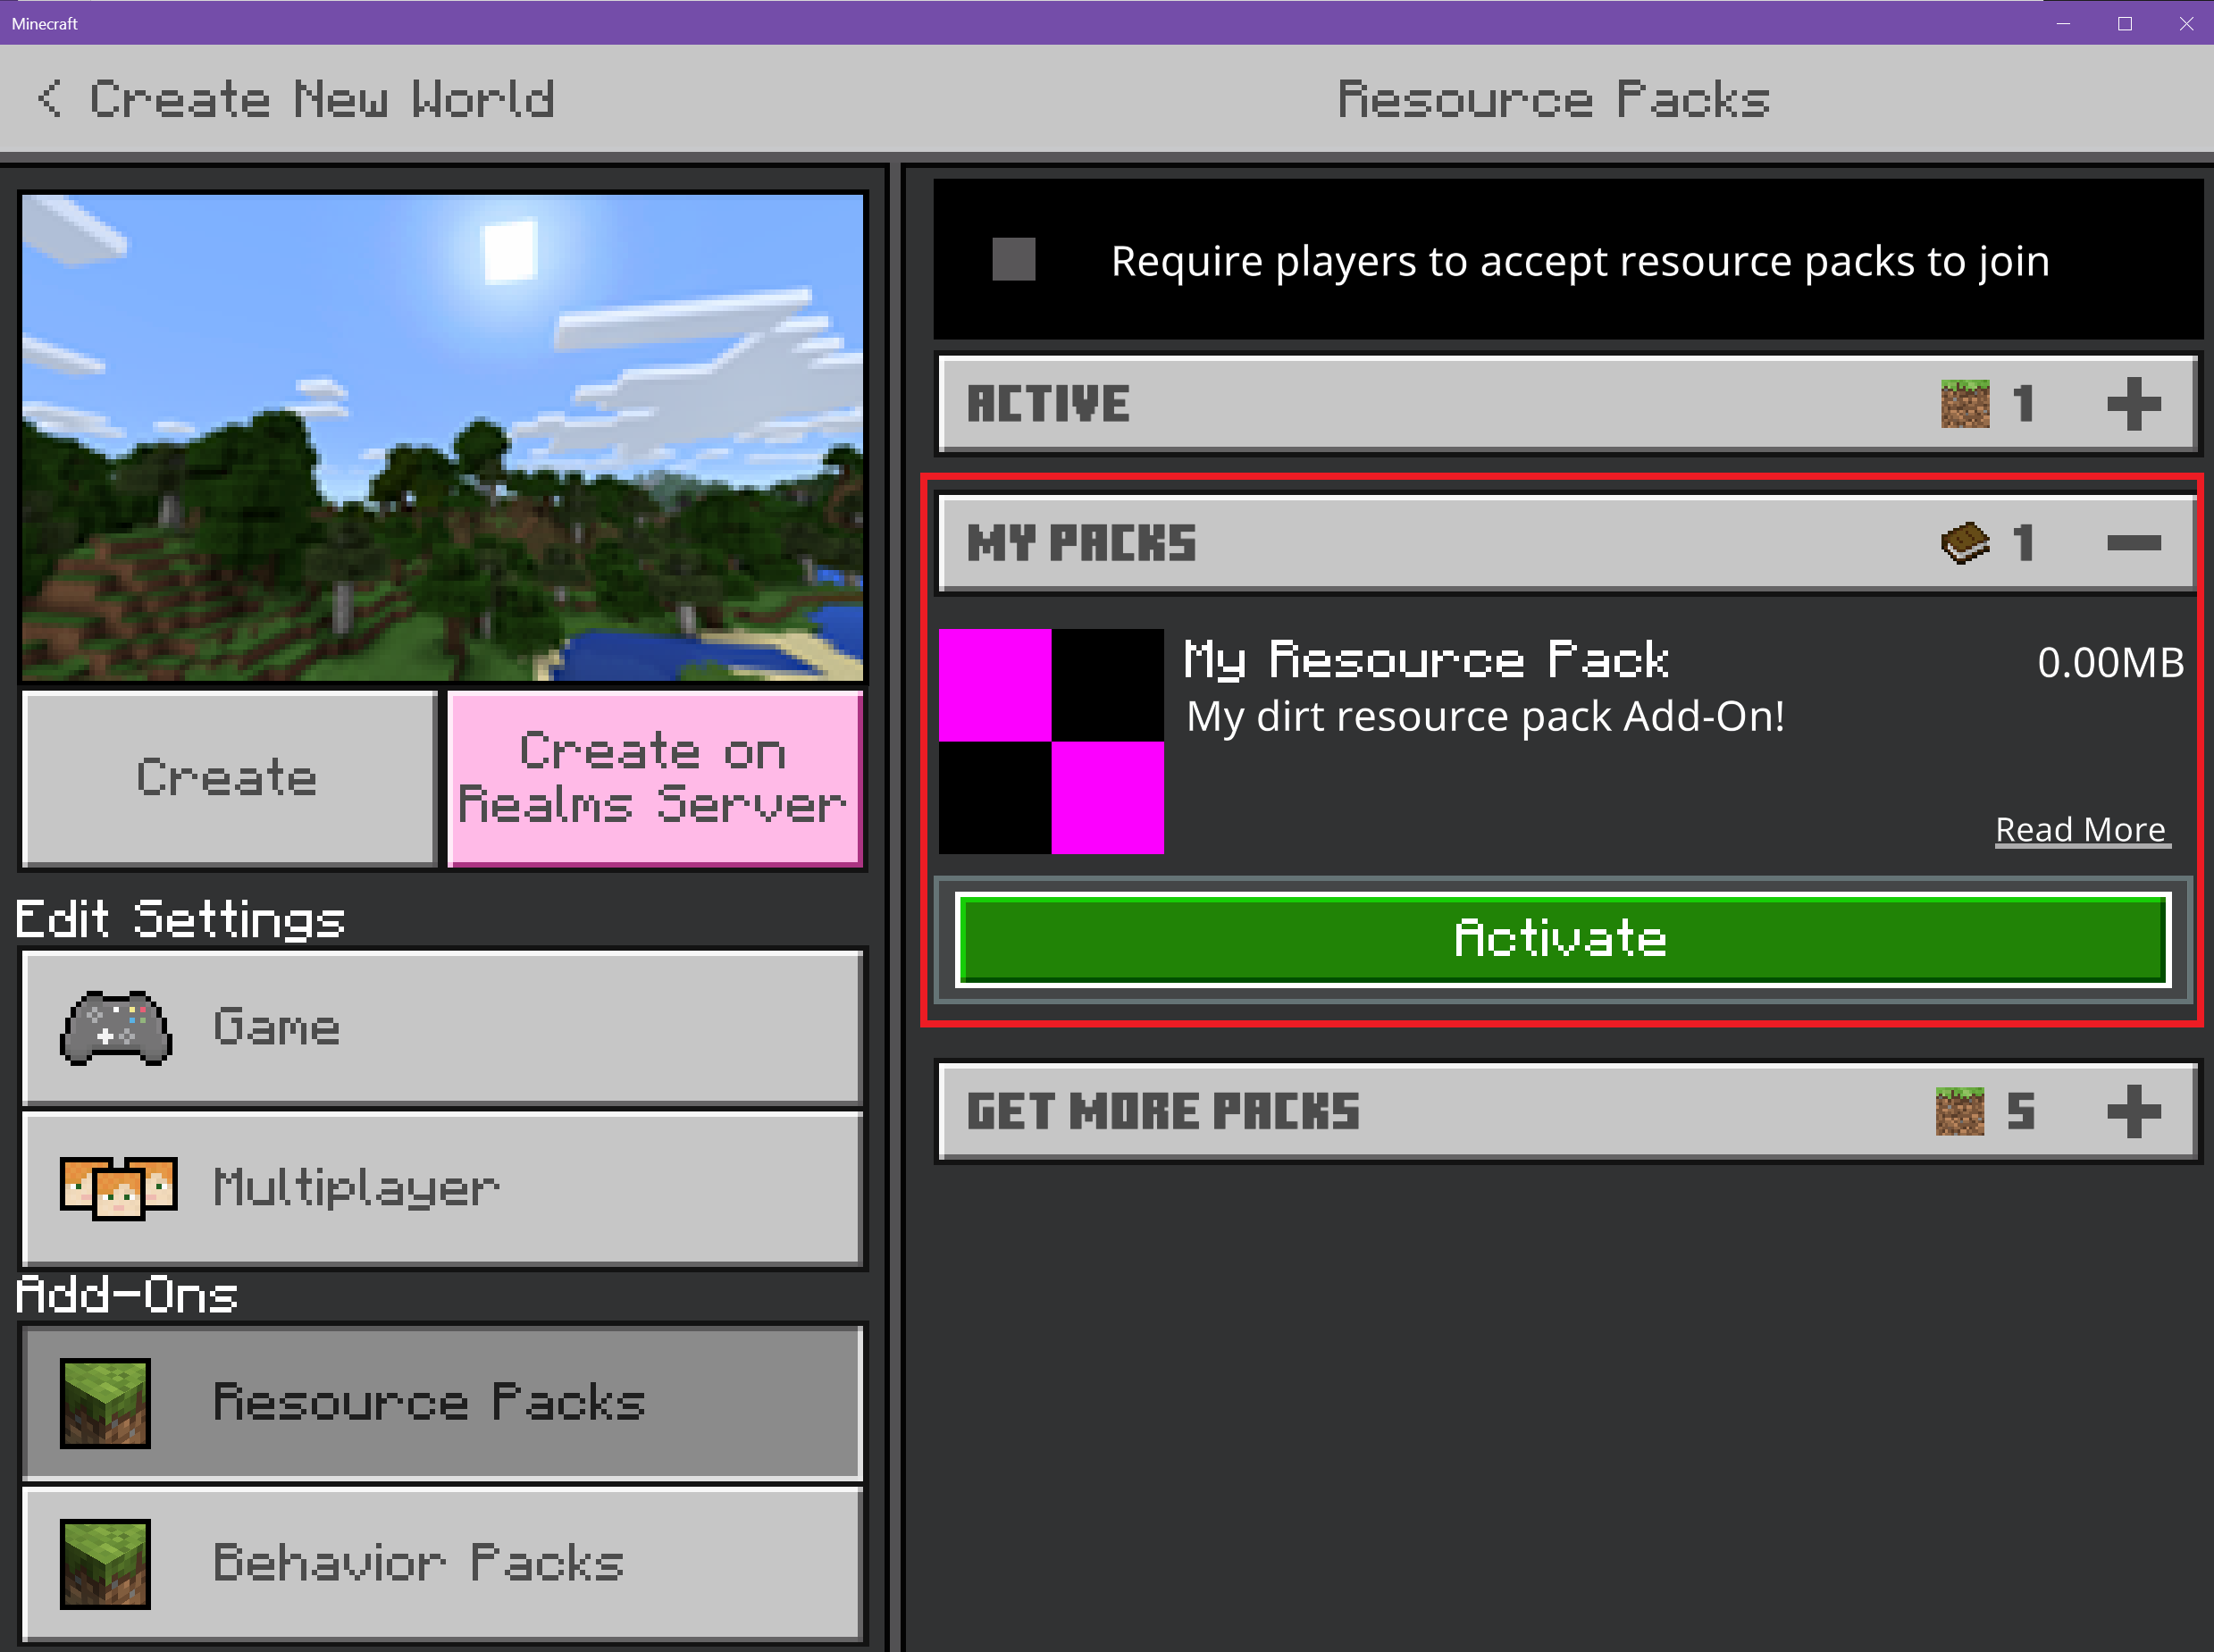
- Launch Minecraft and select Play.
- Select Create New World.
- Under Settings, whorl down to the Add-Ons section.
- Click on Resource Packs to see all available packs.
- Click the MY PACKS drib-downwardly to open up it.
- Select My Resources Pack and click Actuate to add together the resource pack to the globe.
- Click Create to create your globe.
What's Adjacent?
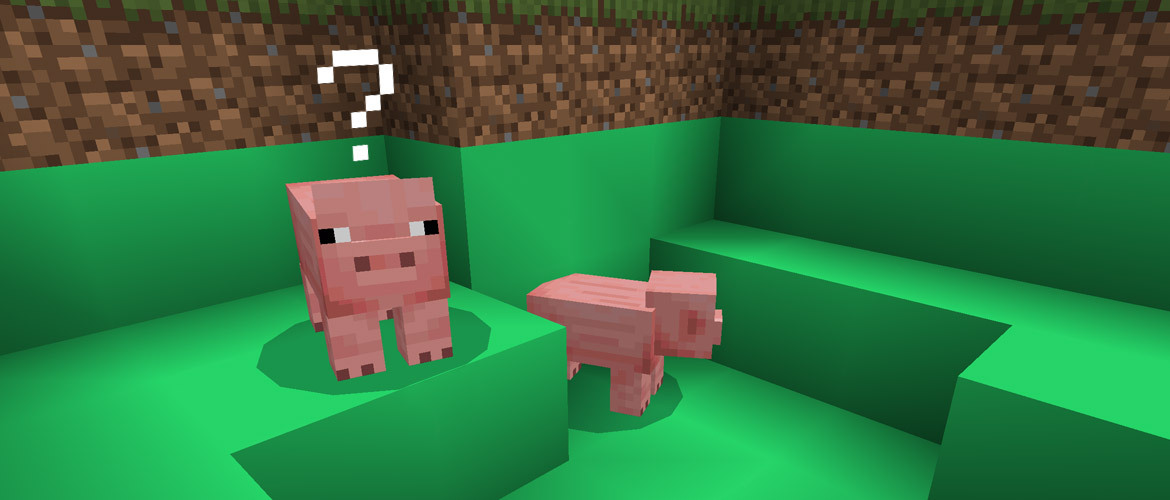
With a custom texture at present a part of your Minecraft world, it's time to see how behavior packs alter existing entity behaviors. In the adjacent department, y'all will add an aggressive beliefs to a normally peaceful cow entity.
To see examples of unchanged resource and beliefs files, check out the Minecraft Vanilla resources pack and Vanilla behavior Pack.
Feedback
Submit and view feedback for

Source: https://docs.microsoft.com/en-us/minecraft/creator/documents/resourcepack
Posted by: graytimit1951.blogspot.com
0 Response to "How To Change Music In Minecraft Resource Packs"
Post a Comment